Archives

Introduction

01Jan

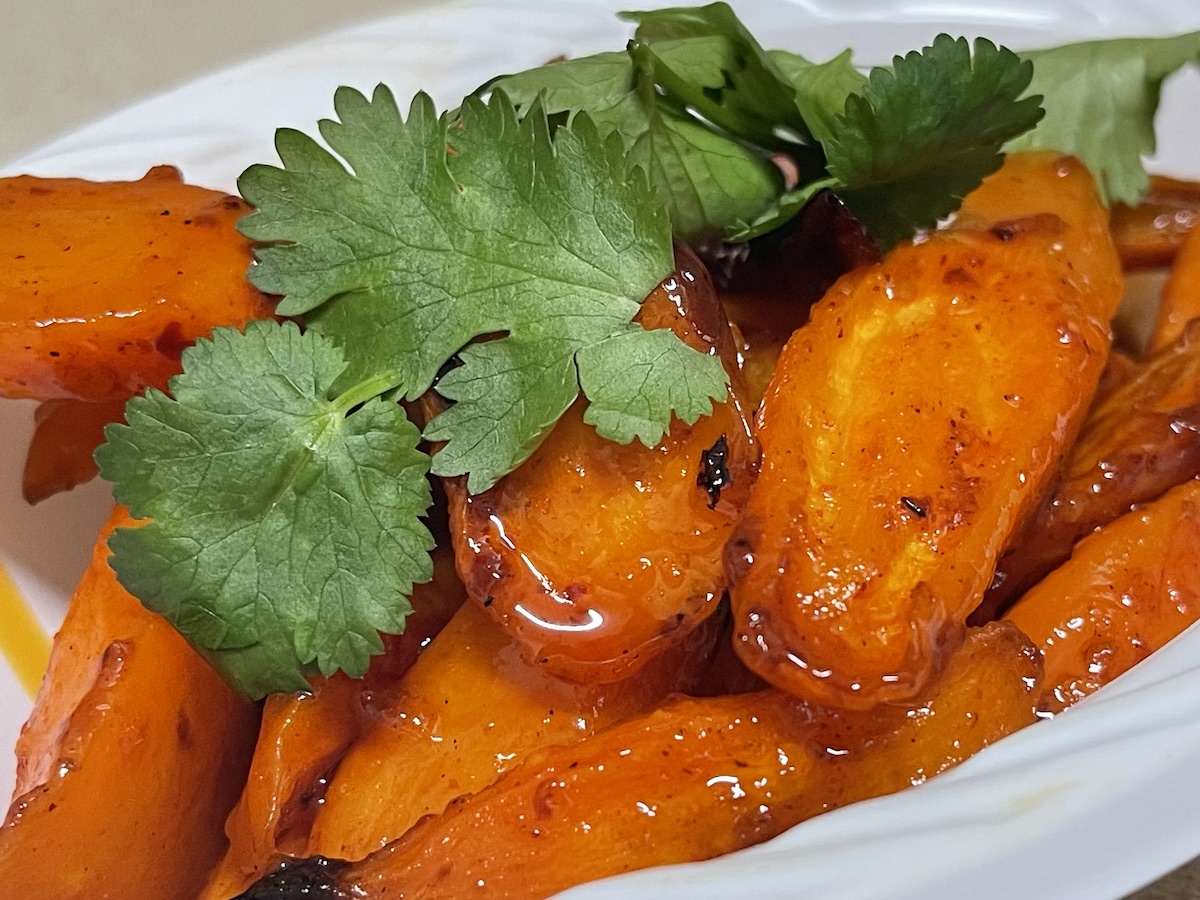
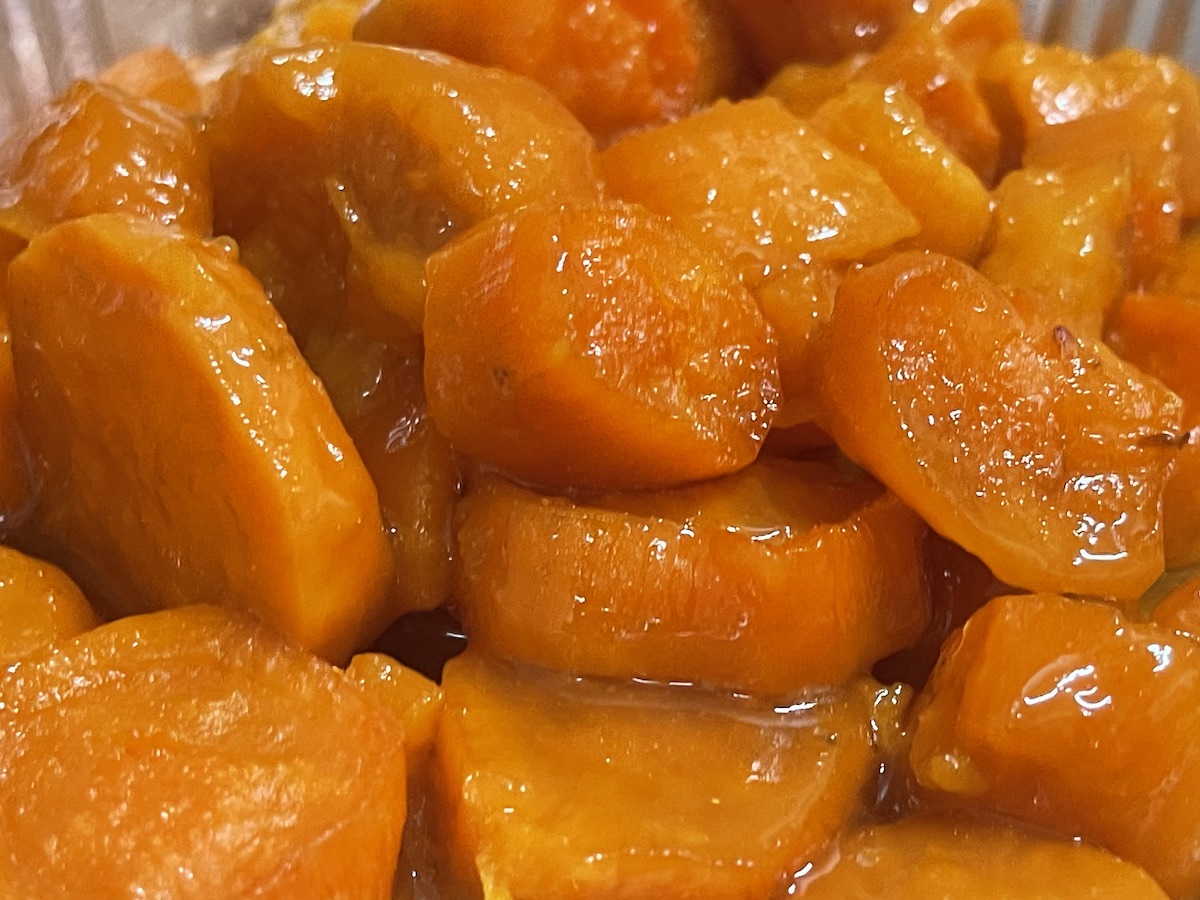
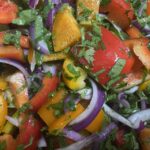
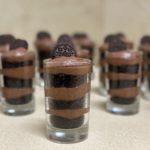
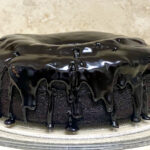
This is not your normal recipe blog. Many of the guests at Beit Chai have asked us to release a recipe book, but I do not like recipe books nor do I follow a recipe to the letter (this of course often gets me in hot water with Jacques) especially when it comes to baking as he always says that baking is a science.

Well I was never big on science so I like to play around. This is why this is not the average baking and cooking site because we very seldom give exact measurements so you will have to shake off the expectations of preciseness and just enjoy exploring and discovering what you can create in the kitchen.

For us the kitchen is our ministry and also our playground. We love creating dishes that serve our guests and leaves them feeling like royalty, like they have had a few hours at the Father’s table and shared a meal with Him and fellow believers.

This is our hearts while cooking and baking and serving our meals. We pray that you will be able to take one of our suggested dishes and playfully make it your own as you cook and bake with us.

Then of course we want to acknowledge that nothing that we are able to carry through the doors of the kitchen of Beit Chai is because of our own skill, we are very much aware that the Father gives us grace to do what we do and for this we always honour Him.

Our Challah Recipe

01Jan

So this is one of the few recipes that we do follow exact directions

The reason is because we started with a totally different recipe and adjusted it about a million times and also gave up a few times before eventually getting the exact texture and taste that worked for us. 

This being said sometimes my hand does slip a bit and more flour or oil makes its way into the mixer but thankfully the Challah is very forgiving and ends up being a beautiful creation that leaves our guests satisfied. 

Of course the best way to serve this Challah is nice and hot from the oven. 

Sometimes we decide to make an extra few batches of dough while the machine is already ‘in use’. We let it rise as normal but once we have braided the Challah we pop it into the freezer before the second rise. Fast forward to next week or the week after and we want a lazy meal for Shabbat, we take the frozen dough out of the  freezer 3 to 4 hours before we want to bake it.

What you need

10-13g yeast
1 Tbsp Sugar
A little bit of water
800g Flour
80g Sugar
60g Oil
1 Egg
300g Milk
1 Tsp Salt

Dissolve the yeast, 1 tablespoon of sugar and a little bit of water together into a measuring jug and let it stand for 5 minutes

While the yeast is activating measure out your flour, sugar and salt into your mixing bowl

Add your egg to the flour mixture

Measure the milk and oil into the yeast and mix it well

Pour the mixture into the mixing bowl with the flour and mix it all together.

We use an electronic mixer with a dough hook but you can also knead this by hand.

For a good dough consistency you need to knead the dough for about 10 minutes.

Put the dough into a lightly oiled bowl and cover with a towel or plastic bag.

Let it rise until doubled in size (usually about 2 hours)

Knead it down and braid

Let it rise again for one hour and bake at 180 degrees for about 20 to 25 minutes (if you have a meat thermometer poke the Challah – the inside temperature should be 90 degrees Celsius)

For braiding instructions you can watch Jacques in action by clicking on the video instructions button.

Butternut Soup

01Jan

The first time in my life that I ate butternut soup was on my 21st birthday.  I never had an end of school education celebration due to the fact that I didn’t finish school – this in itself is a story for another time.  My mother decided to celebrate my 21ste birthday as a celebration of my life, which the enemy tried to rob many times.  She decorated the house and bought me a beautiful dress and then she hired caterers for the evening.  On the menu was butternut soup.  It was absolutely delicious!  So this soup is more a fond memory then just a recipe.

Ok I will come right out and say this, there are very few times that we follow the recipe exactly.  Many times we just guess the amounts without weighing it out exactly.

What you need

  • 5 kg butternut 
  • 4 x 200g Granny Smith apples
  • 2 x 100g chopped onions
  • 1 Cup of orange juice
  • 2 packs of cream of chicken soup
  • 2 l of milk
  • Salt and pepper
  • 3 teaspoons of Curry powder
  • A half a teaspoon of chicken spice
  • 250ml mayonnaise 
  • 250ml cream

We have found that butternut is a hard vegetable to peel and cut, so we prefer to wrap up the whole butternut in foil and roast it in the oven until it is soft.  Once it has cooled down enough that we can handle it, we remove it from the foil and remove the skin and seeds and then mash it. We also feel this enhances the flavour instead of boiling cut pieces of butternut in water. You can do it either way you want.

Peel the apples and cut and core them.  Peel and cut the onions into pieces and boil it together with the apples until it is very soft. Then drain off the water.

Like many of our adventures in the kitchen, Jacques does certain things while I do others.  This way we work together seamlessly. Jacques blends together the butternut and some of the milk until it is nice and smooth. He then continues to blend the soft boiled apples, onions with the orange juice until it is a nice fine pulp texture. We often use a bit more orange juice than what the recipe calls for.

I heat the the rest of the milk, curry powder, chicken soup powder, salt and pepper together until everything is combined. As I said, we don’t really follow the precise recipe and most time we have more butternut than we should so we then add a liter or two of chicken stock as well. Then we add the butternut, apple, onion, orange juice pulp with the milk and spices.

Heat up everything together making sure that it is a nice smooth texture. We sometimes blend everything a bit more in the pot with a stick blender. Then we add the mayonnaise and cream into the soup, making sure everything is combined well.

Again presentation is key so we like to serve the soup with some dried pumpkin seeds on top of each bowl.

This recipe goes very well with some of our homemade breads.

Lentil Soup

01Jan

Winter in Israel is very cold and wet.  On such days a nice hearty soup is always a good idea.  There used to be a lot of nice 5 shekel coffee shops who would also sell a very nice cup of lentil soup.  Today very few of these places are still operational and their soup is no longer only 5 shekel.  

We recently started making our own lentil soup and the advantage of this is that we can add anything that we want.  We discovered that lentil soup with the addition of meat is really yummy.  Now we always add meat to our lentil soup and although it takes extra time and effort it is definitely worth it.

What you need

  • Slow Roasted Meat 
  • Lentils (we used brown and red)
  • Onions 
  • Celery
  • Carrots 
  • Olive Oil
  • Beef stock 
  • Salt
  • Hawaij Soup Spice – A mix of Cumin, Turmeric, Blackpepper, Cardamom and Clove
  • Extra Cumin
  • Chutney optional
  • Fresh Coriander

First you need to slow roast a cut of meat. We like brisket but any boneless cut of beef that you prefer should work. Add your preferred spices but smoky flavoured spices enhance the taste of the soup. One of our favourites is Sweet Mesquite Seasoning. Add some water to your roasting pan and roast at 125-150 degrees Celsius for a few hours. When the meat is cooked you can either shred it with an electric beater or let it cool and cut it into small 1cm cubes.

We cook our lentils in a pressure cooker with the spices and salt. You could also cook it in a pot but then you need to let the lentils soak for a few hours before hand. 

While the lentils are cooking, chop up some onions into small squares. Cut the celery lengthwise once or twice and then chop it into cubes. In a saucepan start frying the onions and celery in olive oil. You can also alternatively fry it in the beef fat that rendered out while roasting.

Peel and cube the carrots and add it to the saucepan. Add some beef stock, or even better, the juices from the bottom of the roasting pan. Cook until the carrots are ready.

When the lentils are done cooking in the pressure cooker some of them get puréed but when cooking on a stovetop this might take a while. You might want to take a stick blender and blend it a bit. Add the meat, onions, celery and carrots. Add chutney to taste.

In Israel we are not fortunate enough to be able to buy chutney from the shops, thus we have started making our own.  We have found that adding a bit of our own homemade chutney adds just enough sweetness and acidity for a wholesome taste to the soup. 

If the soup is too thick, add some water. Taste it, add more salt or spices if needed.

Serve with some fresh coriander.

Chickpea Salad

01Jan

This is a recipe we found on the internet many years ago.

It is one of the absolute favourite salads that we serve.

Most of the guests love this salad and more often than not ask us for the recipe.

Of course we have made our own adjustments to the recipe and sometimes we even adjust our adjustments depending on what we forgot to buy or our own mood while making the salad.

What you need for the salad

  • Chickpeas (we use frozen chickpeas)
  • Celery
  • Red onion
  • Dried apricots
  • Peanuts
  • Cilantro
  • Diced Red Pepper for colour (Optional add on)

What you need for the dressing

I will not give any exact amounts because I cannot – I never use any measuring system when making a dressing.

  • Mayonnaise
  • Curry Powder
  • Salt
  • Sugar
  • Vinegar (only enough to make the dressing a little bit runny)

Put the frozen chickpeas in a pot with water.  Bring it to boil. Only once it has boiled for a. while add your salt into the water.  If you add salt from the start it does not allow the chickpea to soften.  I like to already add some curry powder to the water at this stage.  It feels to me that the curry flavour then penetrates the chickpea (or maybe it is just my imagination).

Once the chickpeas are soft remove from the heat and drain the water and allow them to cool down. If you are using dried chickpeas remember to soak it in water for at least 8 hours before cooking it. You can always cheat and use canned chickpeas but I would not do it as I do not like the taste of canned chickpeas.

Jacques is an expert cutter so he is in charge of chopping the red onions for the salad.  He chops the onions nice and fine.  We have used white onions also but the red onion brings a nice colour to the salad.

The apricots we dice into small pieces about the size of the chickpeas (if I am lazy and Jacques is not watching then I use a scissor to cut them. The apricots can also be substituted with other dried fruit.  We have used cranberries or finely chopped dates (I do not prefer this as I really have very strong negative feelings about dates – I will not elaborate – come to Israel and ask me in person about this).  We definitely do not use raisins as Jacques does not eat raisins that are mixed with other food but if you do not mind then this is an option for you.

The celery we use only the stem and also chop it very finely so that the taste does not overpower the salad.

For the dressing mix the curry powder, salt, sugar and mayonnaise together in a bowl, jug or container of your choice. Add the vinegar little by little until you get a nice (not to runny) consistency.  Remember to let “your Jacques” taste the dressing before adding it into the salad.

Mix all of the above ingredients together once the chickpeas are cooled down and then add the dressing.  This salad is perfect to make a day before you use it. We have found that the flavours enhance as it rests together.

Cilantro is definitely Jacques’ baby because he says I kill the herbs if I chop it, this together with the peanuts we only add just before we serve the salad.

We have also on occasion substituted the peanuts with cashews or almonds.  It is nice to add some kind of nut for the crunch in the salad.

Chopped Salad

01Jan

While preparing for a shopping trip to purchase ingredients to create a Shabbat meal, I was searching online for a few new salad recipes.

My eye caught a picture of an Israeli chopped salad recipe that I thought looked appetising. Although we have made this kind of salad more times than we can count, we decided that it would be a good fit to the rest of our menu.  I made my shopping list and off we went to the shops.

We purchased everything we needed and when Thursday arrived (which is normally our preparation day for larger Shabbat meals) we started our preparation.

As we started preparing the salad we decided that we didn’t want to follow the recipe anymore and  made our own version of the chopped salad.

So this is what we ended up with and believe me it was very tasty and so beautiful that it is definitely going to be a new favourite.

What you need

  • An assortment of different colour bell peppers (We don’t use green pepper as much as they have a more bitter taste.)
  • Red onions
  • Fresh coriander
  • Fresh parsley  

What you need for the dressing

Olive oil
Lemon juice
Salt and pepper
Za’atar

Za’atar is a spice that we buy in Israel, which I am not sure if you are able to buy it in your home country.  If not come and visit us and we will show you where to purchase it at the Jewish market.

Cut the bell peppers in nice big pieces – we wanted a chunky salad so our pieces were about 1.5-2cm by 1.5-2cm.

Cut the red onions in thin slices.

Roughly chop the coriander and parsley – we used a whole lot of fresh herbs to advance the taste of the salad.

Mix the olive oil, lemon juice, salt, pepper and za’atar together until they are well combined. Za’atar is spice blend popular in Israel made of hyssop, sumac, sesame and salt.

Once all the ingredients of the salad is nicely mixed add the dressing – we added our dressing just before we served the salad.


Quinoa Salad

01Jan

One of our dear friends introduced Jacques to quinoa salad while she and her daughters were visiting Israel even before we got married.  A quinoa salad is a great addition to any meal.  We especially like to serve it when we are making a roast in the oven as it’s fresh acidic taste brings a nice balance to a rich meaty taste.

I have a hard time making the quinoa itself as it has a tendency to overcook which leaves the texture mushy, so I have now opted to leave the preparation of the quinoa in Jacques’s capable hands. There are many helpful websites with instructions on how to prepare quinoa but this is a method that works for us.

What you need for the salad

  • Dried quinoa
  • Cranberries or dates
  • Fresh mint leaves
  • Shavings of almonds

What you need for the dressing

  • Olive oil
  • Apple cider vinegar
  • Dijon Mustard we like to use the one with the mustard seeds in.
  • Maple syrup or honey
  • Salt and ground pepper
  • Lemon juice

A very important step is to first wash the quinoa before you boil it as it can have a bitter taste to it if you don’t.

We use a ratio of 1 cup of quinoa with 1 and 1/2 cups of water with a bit of salt.  With the lid off bring the quinoa to a boil. Reduce the heat, cover the pot and allow to simmer for 10min (please set a timer as it is so easy to forget about your quinoa on the heat).  Remove the pot from the heat and leave it covered to steam for another 10 minutes.  Remove the lid fluff the quinoa using a fork.

Allow the quinoa to completely cool. We normally cook it the day before and combine the rest just before serving to keep everything nice and fresh. You can also make the dressing the day before.

When making the dressing make sure that you do not make too much, you basically just want to wet the salad and not drench it with dressing. We use about the same amount of olive oil, apple cider vinegar and lemon juice and then add the mustard and maple syrup, salt and pepper. Taste the dressing to make sure it has enough of everything. You might want it a bit more sweet or acidic, it is easier to adjust the flavour of the dressing before adding it to the salad.

Add your sliced almond or nut of your choice. It is just to add a crunchy texture to the salad, so you don’t need too much.

Add the cranberries or dates. Cranberries are easy while dates are a bit more work. Both options are great, this depends on your personal preference. For the dates you need cut it open and remove the pip, cut it into 1/2cm slices lengthwise and then cut these strips into squares. Dates get sticky when cutting to avoid it sticking to the knife you can oil your knife or keep a container of hot water nearby to melt the sugars off the knife.

The mint leaves are a bit of a hassle to prepare but the taste is worth the while.  We normally purchase a nice bunch of fresh mint.  Remove the leaves and stack them on top of each other and roll them up like a little cigar. Then we cut it into thin strips.  The more mint you add to your salad the more flavour and colour you will have.

Just before serving, add the dressing and make sure everything is well combined. If you have some extra dressing you can save it for later. You can add some mayonnaise to it this goes very well on a leafy salad.

This is a very nice way to serve the quinoa salad and we prefer to keep it simple. 

If however you want to increase the volume of your salad you can consider to add chopped cucumber pieces, cherry tomatoes cut in half, diced red onions or even diced of bell peppers.

Roasted Butternut and Glazed Nuts Salad

01Jan

One of our favourite salads to make is a large leafy salad.  We purchase different types and colour salad leaves and then you can basically do anything on top of it.

Of course one of our main goals when preparing a salad is to make it as beautiful as possible.  We normally use a flat serving plate so that all the elements of the salad can be appreciated and all the guests can help themselves to all the different ingredients.

What you need for the salad

  • Different kinds and colour salad leaves 
  • Butternut
  • Olive oil and spices for the roasting of the butternut
  • Walnuts or any nut of your choice 
  • Butter and honey or syrup to glaze the nuts
  • Red onion
  • Feta cheese 
  • Roasted sunflower and pumpkin seeds

What you need for the dressing

  • Honey
  • Mustard 
  • Vinegar 
  • Mayonnaise 
  • Salt mixture of your choice 

Peel and cut the butternut into pieces.  Not too small as they do tend to reduce in size while roasting.  This of course is Jacques’s job as I do not have enough strength in my arms to cut through the larger pieces of butternut

Coat the butternut with olive oil and any spices that you prefer. More oil is better, we aren’t deep frying it but we are also not shy with the oil.  Salt is also important, you might get a nice color by adding paprika or cinnamon but if there is no or little salt the taste would be less pleasant that having just enough salt.

Spread them out in a single layer onto a baking dish and place them in the oven.  Make sure to stir them around on the dish every now and again to allow an even roast.  When they are soft but not mushy and have a nice brown colour remove them and allow to cool down.

In a pan melt butter and either honey or syrup.  Add the nuts and stir until all the nuts are covered in the butter.  Continue to stir around until the butter and syrup form a nice sticky coat over the nuts.  It is better to work on a lower flame so that you do not burn the nuts.  Once they are nice and sticky put them on a baking sheet and separate them as much as possible and allow to cool down.

Cut your red onions in nice thin slices.

Put the sunflower and pumpkin seeds into a pan over a low heat.  Stir or even better if you can toss them around in the pan until you can smell them roasting – remove from the heat and allow to cool.

Now to pack the salad.

Here you can either do a single layer or a double layer of all the ingredients.

Take your serving dish and cover the base of the dish with your assortment of salad leaves.  

Here you can be creative and pack the rest of the ingredients onto the salad leaves.  

Normally we leave the feta and seeds for last.

Mix all the ingredients for the dressing together.  Do not use too much vinegar, it is actually just there to allow your dressing to be a bit runny but not too runny for easier application.

Make sure that you taste your dressing before adding it to your salad.

We normally add the dressing just before serving it so that it doesn’t just run down the plate.

When adding the dressing it is important not to drown your salad.

With a salad the sky is the limit.   You can add and take away according to your taste. The trick is in the presentation and making sure that all your ingredients are nice and fresh.

Carrot with Sweet Chilli Sauce

01Jan

This is an accidental salad. We were planning on making carrots in the oven to serve as a hot side with our main course but we had a few last minute surprise guests and then we realized that we had too little carrots to serve as a side dish so we decided to make it as a salad together with our Challah and other salads. 

What you need

  • Carrots 
  • Olive oil
  • Sweet paprika spice 
  • Sweet chilli sauce
  • Ground salt

Peel and cut your carrots 

We like to play around with different shapes when it comes to cutting carrots. We cut these diagonally but your carrots can be any shape.

Place the carrots in a baking dish and cover them with olive oil, sweet chilli sauce, salt and paprika. 

Stir it through making sure that all the carrots are covered and roast it in the oven uncovered  until they are soft and the sweet chill has formed a nice sticky glaze on the carrots.

Remember to stir the carrots a few times through the roasting process a few times to avoid them from burning and to make sure that they all cook evenly and stay covered in the sauce.  

When roasting carrots it is also best to rather have a single layer of carrots than too many on top of each other so that they roast evenly instead of steaming.

When the carrots are done allow them to cool down, serve them in a nice glass bowl and dress it with a nice piece of fresh coriander.

Although it was an accidental salad, I think it will definitely be a repeat dish.

Sweet Potatoes in the Oven

01Jan

This recipe is something I learned from my mother.  She used to make it often when we were growing up especially with a roast.  Today it has also become one of Miriam’s favourite dishes.  So I think it will continue for another generation.  The only difference is our sweet potatoes here in Israel are orange instead of a more yellow coloured one as in South Africa.

My mother used to make it in a pot on the stove and we started out doing it like this but due to the fact that we have to serve it on a large scale we started preparing it in the oven.

What you need

  • Sweet potatoes
  • Butter
  • Golden syrup (a healthier version would be honey or even date honey)
  • Ground Salt

Peel the sweet potatoes and cut them into rings.  Make sure that the rings are not too thick but also not too thin, maybe 1.5-2 cm thick.  The idea is that they would be more or less the same size to help with an even cooking time.

In a pot

Place the raw sweet potatoes in a pot on a medium to high heat. Be careful not to over crowd the pot.  Cut your butter into smaller pieces and distribute it amongst the sweet potato pieces.  Grind enough salt over the sweet potatoes.  Pour your syrup or honey over all the pieces.  

Stir through and cover the pot with a lid.  

While the sweet potatoes are still hard you can stir it frequently to make sure all the pieces are covered with butter and syrup.  

Once they soften you have to be careful not to stir them too much to prevent it from becoming mash.  At this point we remove the lid of the pot to allow the syrup to caramelise.

In the oven

Heat your oven to 150 degrees Celsius.  Place the raw sweet potatoes in a baking dish, be careful not to over crowd the baking dish.  Cut your butter into smaller pieces and distribute it amongst the sweet potato pieces.  Grind enough salt over the sweet potatoes.  Pour your syrup or honey over all the pieces.

Once the butter and syrup starts to melt remove it from the oven and stir it to ensure that all of the sweet potatoes are coved with the butter and syrup and place it back into the oven.

You can repeat this a few times during the cooking process to make sure that the sweet potatoes remain covered with the butter and sugar.  Once they are soft and the syrup should have caramelised and it is ready to serve.

If you see that the syrup is runny, you can pour the syrup into a pot and reduce it on the stove and then pour it over the sweet potatoes again. This usually happens if they were overcrowded and the steam created couldn’t escape.