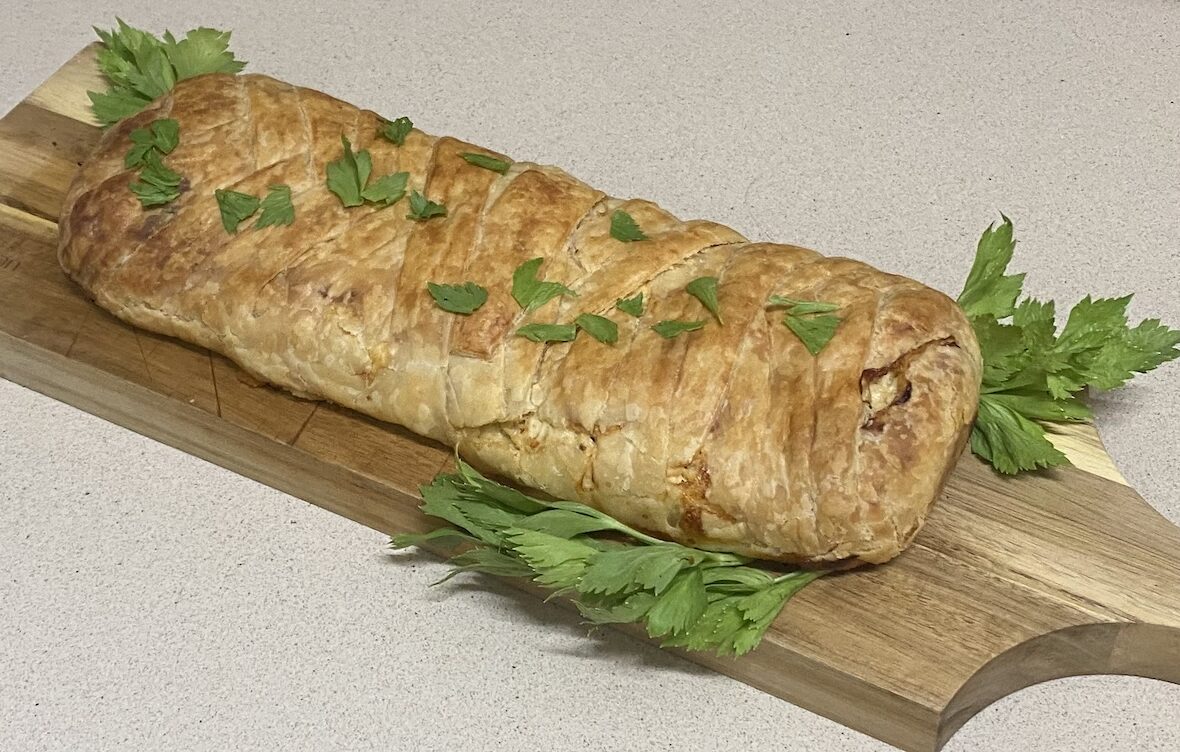
This is an absolute winner recipe. It has never failed to impress our guests. It has however caused us the occasional moment of stress if we didn’t put it in the oven early enough or if we made our filling a bit too moist and it started to cook out of the dough.
This pie likes to rest a little bit after being baked before we cut it so we always take this into consideration when we calculate our cooking time to allow enough time in the oven, time to rest and time to cut before presenting it to the guests.
We have two different fillings that we use and we will give you the recipe for both on this page.
Chicken Pie
Boil the chicken breasts in water together with your own unique mixture of spices.
Once the chicken is cooked remove it from the water.
Wait, wait, wait – before you just through the water down the drain. Let it cool down and then pour it through a very small strainer into an empty, washed out milk carton. Label it with a maker and store it in the freezer and then when you are ready to make our butternut soup (see recipe to the side) then you have your own chicken broth. The nice thing about the milk cartons is, you can tear the carton open when you are ready to use it and put the frozen block of stock directly into the pot.
While the chicken is still hot cut it into smaller pieces making sure that there are no bones or cartilage in the meat. Take a double whisk mixer to shred the chicken. This is a very nice easy way to get nice fine strands of chicken within no time.
When the chicken has cooled down mix it with some shredded cheese and mayonnaise. The amount of cheese depends on your own preference, but not too much that it will cause the pie to leak oil while cooking. We use about a third of the weight of the chicken. I have also on occasion added sweet chilli sauce and mustard to the chicken for additional flavour.
The end result of your filling should be that it can hold its form but not to wet that it will cause the pie to be a runny mess.
It is all about trial and error and having fun while learning
Meat Pie
Like I mentioned before we very rarely roast a piece of meat for a pie it is normally when we have left overs that we use this meat to make a pie.
If you have a piece of meat which is just finished roasting you can cut it in smaller pieces and also use a double whisk mixer to shred it into smaller pieces. If your meat is already cold then a mixer doesn’t work as effectively so you might need to cut it with a knife into small pieces.
When your meat is nice and fine add your shredded cheese and mayonnaise and make sure it is mixed well. We use less cheese and mayonnaise with the meat than with the chicken as meat tends to be a bit more oily than the chicken. Again the idea is that the consistency of the meat would be to hold itself together when placing it onto the dough
I am not even going to try to explain in words how to roll out the dough and the braiding process, for this we made a video.
I will however say this. When rolling out your dough make sure of the following
– Your dough is nice and cold
– Your surface has enough (but not too much) flour on
– We only roll out the ends of the dough leaving the middle part a bit thicker to help the pie to keep its form.
Once the pie has been braided you have one of two options. You can either place it in your pre heated oven at about 180 degrees Celsius for an hour, or you can place it in your freezer to use at a later date.
If you choose the oven then first take some milk and brush the dough lightly with the milk to ensure a nice brown bake. We also sometimes put sesame seed on top of the pie. After about an hour your pie should be done. Make sure that your dough is cooked through and nice and crunchy at the bottom. Allow it to rest for a while before cutting it.
If you choose the freezer then you can place it uncovered in the freezer until it has frozen enough to keep its form and then place it in a bag or wrap it with cling wrap to store for a later date.

