Dessert

Oreo Cheesecake

01Jan

This recipe we also found on the internet and modified it to our personal taste, again I apologise that I am not able to give you exact measurements as I always kind of guess the amounts of the ingredients that I need but I will try my best to explain it so that you can also enjoy this at your home.

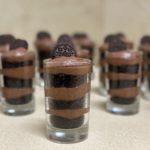
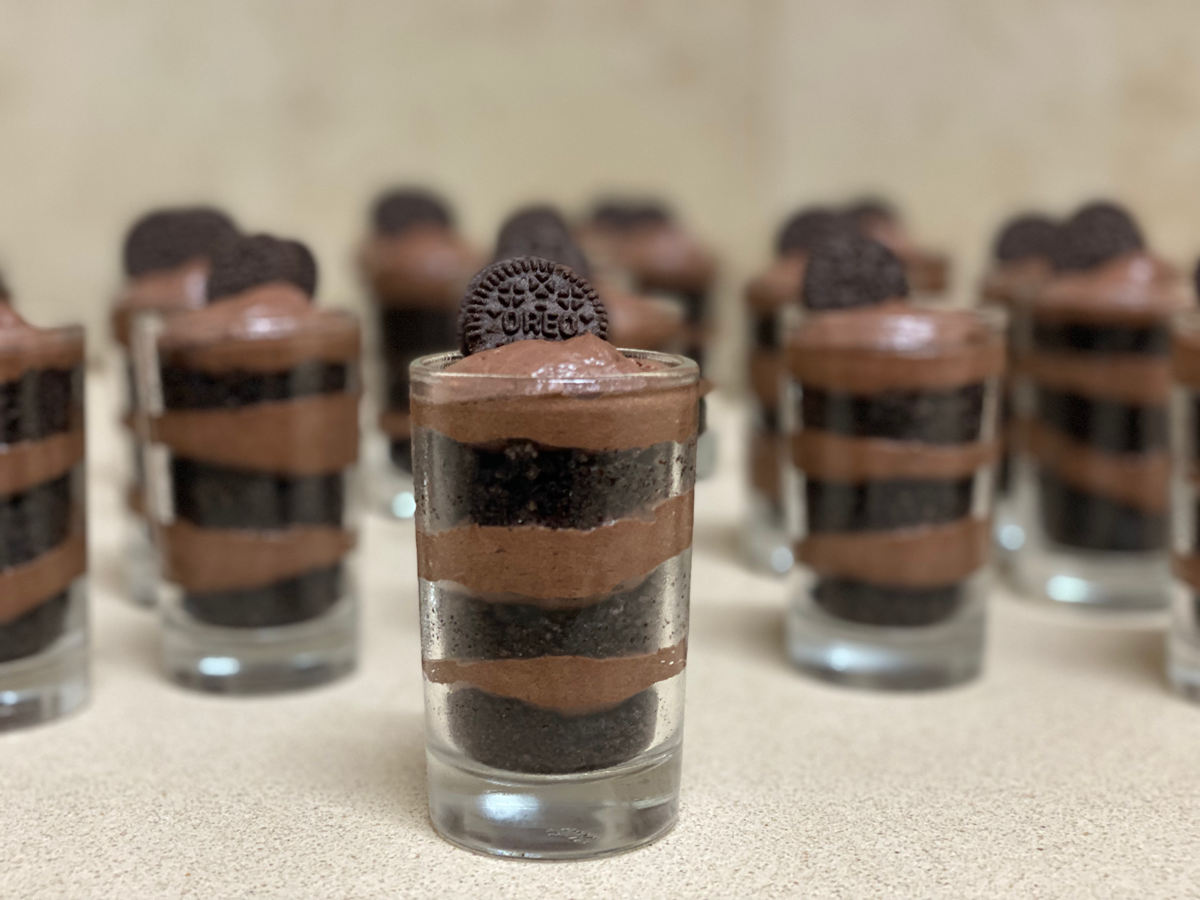
This desert is so easy to make and it is very tasty. It also presents itself very beautifully in a glass as an individual serving so that the guests can see the different layers.

What you need

  • Oreo biscuits
  • 1 container of cream cheese
  • Cocoa powder – sifted
  • Icing Suger (Powder sugar) – sifted
  • Cream – whipped until it has formed very stiff peaks 

We adjust our amounts according to the amount that we need to make.

First we crush the Oreo biscuits until nice and fine, or rather Jacques crushes the biscuits.  This is a job that I really do not enjoy doing so he is the boss of the biscuits.  After the biscuits are crushed he puts a thin layer into our serving glasses. We have nice small dessert size glasses but a wine glass also works great.

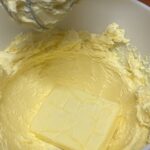
In Israel cream cheese like Philadelphia is very expensive so we rather purchase a large container of Gvina levana, a soft white creamy cheese yet much lower fat content and let it drain through a cheese cloth for a few hours until it is the consistency that we need.  This of course is Jacques’ job as I refuse to touch the white cheese. It is completely gross. 

(Sorry I should probably not say this on a recipe)

Once the cheese is the right consistency we put it into the mixer and whip it so that it becomes nice and fluffy.  Then we add the icing sugar and cocoa powder to the cream cheese.  The best advice that I can give regarding amounts is that you taste while you add your ingredients until it is as sweet and chocolaty as you prefer.

Once the icing sugar and cocoa are well mixed with the cream cheese we add the whipped cream and mix it all together.

Place the mixture into a piping bag and then fill the glass container until about half.  Then we add another layer of Oreo biscuits and then again another layer of the cream mixture.

How many layers you do is entirely up to you and also the size of your serving glass.

Other creative ideas for serving suggestions that we have done in the past is the following:

Placing a small amount of plain whipped cream at the top of the final layer.

Placing a small Oreo cookie at the top.

Placing a small mint leaf on top.

Ice Cream

01Jan

This is by far the easiest most successful recipe that we have discovered and have played with, to make exciting variations that can suit any accompanying desert or even stand on its own as a desert.

What you need

  • 500ml of 38% cream – whipped
  • 1 can/jar of sweetened condensed milk

This is just the most basic ingredients to make single batch, but double is always better than single.

Whip the cream until it is stiff and forms peaks.

Add 1 can of condensed milk and mix it together. 

Put it into a covered container in the freezer until frozen (normally at least 8 hours) and there you have it your own homemade basic ice cream.

Everybody will think it is store bought.

But then of course knowing us you have to change it up a bit to experiment with it.

Normally we make it double.

So we do 1 liter of cream
2 cans of condensed milk

To this we add some flavour depending on what we feel like enjoying. Here are a few ideas

  • Vanilla essence for a fresh vanilla flavour.
  • Sprinkles or otherwise known as hundreds and thousands – this gives the ice cream a nice colourful look, the kids love this.
  • Crushed cookies.
  • Chocolate chips – not to much as it can be a bit overwhelming if the chocolate chips are too big (you can always finally chop up a chocolate bar or two).
  • Fine instant coffee powder (the coffee powder we first dissolve with some of the condensed milk before adding it to the cream) – this you have to measure by taste – depending on how strong you want the coffee flavour to be.
  • Peppermint flavour drops – again according to your own taste (you can also add a bit of green food color and chocolate chips).
  • Cocoa powder for a chocolate flavour.

The list is endless – you can really experiment until you have found the flavour that suits your need.

If we make one of the following variations, we substitute one can of condensed milk with one of the ingredients below.  We make sure that our replacement is more or less the same volume as the can condensed milk.

  • 1 can of Caramel (Dulce da Lech)
  • 1 jar of blueberry or cherry pie filling
  • 1 jar of jam

The most elaborate flavor we have made was Strawberry Cheesecake.

After mixing 1 liter of whipped cream and a can condensed milk. We added a container of cream cheese at least 25% fat – which we whipped beforehand. We added a jar of strawberry jam. We crushed some graham crackers and then also mixed it all together.

Like I said the sky is the limit so enjoy playing and experimenting.

It is worth noting that any fresh fruit you add will be icy. We have tried it and its not the most desirable outcome.

Baked Cheesecake

01Jan

Jacques and myself received an Israeli recipe book a few years ago and in it was a very easy baked cheesecake recipe.  We have since adjusted the ingredients a bit according to our own experience.

What you need for the crust

  • Lotus biscuits – finely crushed
  • Two egg yokes

What you need for the cake

  • 750 gram of Soft White Cheese (like a cream cheese)
  • 3 eggs and 2 egg whites – we take the yellow of these egg whites and use if in the crust of the cake
  • 200 gram sugar
  • 1tsp vanilla essence

That you need for the topping

  • 3 x 200gr sour cream
  • 40gr vanilla sugar

We bake our cheesecake in a rectangular foil pan and find that this amount of sour cream is enough to cover the entire cake.  If you are using a different shape of baking dish you might need less.

Pre heat your oven to 180 degrees Celsius.

Crush the biscuits finely We normally use our food processor. The recipe calls for egg whites. We normally saved the yolks for later use but most time they ended up being discarded. One day we thought why not use the yolks instead of butter to bind the biscuits seeing as it gets baked. It worked wonderfully, so once the biscuits are crushed mix in the egg yolks.  Spread it at the bottom of your baking dish and press it down firmly using the back of a spoon (or your fingers).

In a mixer put your white cheese and sugar and mix it well until the white cheese is nice and smooth.   Add your egg and egg whites and mix it again thoroughly.

Add the vanilla essence.

Pour you’re filling on top of your biscuit base.  To achieve a nice even bake on a cheesecake you have to bake it in a water bath.

To avoid spills and burns we normally place our baking dish into an oven pan, put it in the oven and then add hot water into the oven pan. 

Bake for about 50 minutes.

Recently Jacques watched a YouTube video about baking cheesecakes the video suggested that when baking a cheese cake you should be careful not to over bake it.  There should still be a slight juggle in the middle of the cake.  This allows the cheesecake to have a creamy texture.

While baking mix the sour cream and vanilla sugar together.

Once the cheesecake is baked, remove it from the oven and spread the sour cream mixture evenly on the top.

Bake for another 10 minutes

Allow it too cool and store it in the fridge.

Miriam, our daughter, asked us one Shabbat when she was eating her portion how we thought some date syrup would taste on the cheesecake.  We told her to try it and she loved it.  So now when we serve the cheesecake we also bring the date syrup to the table for the guests to also try it.

We have also played with a few additions as an additional topping, here are some suggestions

– A very soft chocolate ganache

This you achieve by warming cream in a pan, (according to the amount you want to use on top of the cheese cake)  remove it from the heat and add chocolate chips to the warm cream.  The amount of chocolate that you use determines how hard or soft the ganache will be.  If the chocolate chips do not melt completely, you can place the pot on the heat again for a few minutes.

I have used a ganache to cover the entire cake as a third layer and also just to use as a decoration on the top.

– We have also used blueberry pie filling as a decoration on the top.

Chocolate Cake

01Jan

If you are very bad at baking and often have failed attempts when making a cake then this is the perfect recipe for you. 

We have made it so many times and it has never failed. Even in a different kitchens in different countries. 

It is our secret weapon miracle cake. 

The beauty of this cake is also that the longer it sits in the fridge the more moist it becomes. 

You might have noticed from the photo we have a beautiful glass serving plate. It’s not our best one, it’s our only one. You might have the same one and not even know it. Many years ago our microwave oven broke and we decided to keep the glass plate as a serving plate for cake. If you don’t have a serving plate you can use your microwave oven’s plate. Just don’t break it.

What you need for the cake

  • 3 large eggs
  • 240g Self raising flour
  • 75g Cocoa
  • 10ml Baking powder
  • 15ml Bicarbonate of soda
  • 320g sugar
  • 5ml vanilla essence
  • 250ml Mayonnaise
  • 330ml Water

What you need for the sauce

  • 1 cup of water or espresso coffee
  • 1 1/2 cups of brown sugar
  • 1 1/2 cups of cocoa powder
  • 1/2 teaspoon of salt
  • 6 table spoons of butter cut into pieces
  • 1 1/2 teaspoons of vanilla essence

Pre heat your oven at 180 degrees Celsius.

Combine the sugar, vanilla essence and eggs into the mixing bowl. Beat at a high speed until nice and creamy.

Sift the flour, cocoa, baking powder, bicarbonate of soda together in a separate bowl. We have heard its best to sift dry ingredients together 3 times to make sure everything is well incorporated.

First add some (not all) of the dry mixture to the egg mixture and some (not all) of the water.

Mix it together. Repeat this 3 times until everything is added together.

Mix well and then pour into a greased cake pan.

We prefer to use a round cake pan with a hole in the middle. The main reason for this is that we can cut more pieces out of one cake without the middle crumbling apart. We have in the past cut 24 pieces out of one cake, with a scoop of ice cream this was still a good portion for our guests.

Bake for 30 to 35 min.

Preparing the sauce

In a saucepan heat the water/coffee with the brown sugar until the sugar is dissolved.

Add the sifted cocoa powder and salt until the mixture is smooth.

Add the butter and vanilla.

Whisk until the butter is melted.

We keep the chocolate sauce in the pan and reheat it just before serving. You can pour the chocolate sauce over the whole cake or cut it into servings and pour the chocolate sauce over each serving.  We have found that this is too much sauce for the cake, but if you do not use everything it is great to keep in the fridge to enjoy over some ice cream.

This is one suggestion for a topping. It is nice as you can serve it hot over the cake and with vanilla ice cream it gives a very nice hot / cold contrast.

We have however tried many other toppings which also worked well on the cake.

Here are some suggestions.

Whipped cream mixed with caramel. 

Whipped cream mixed with Berry Pie filling. 

Actually anything goes. Feel free to experiment. 

Because we find this cake to be so user friendly we have also added red food colouring to make a red velvet cake – although we do have a separate recipe for a genuine red velvet cake.