What’s Cooking at Beit Chai

Broccoli Salad

01Jan

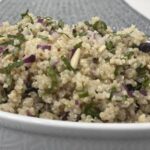
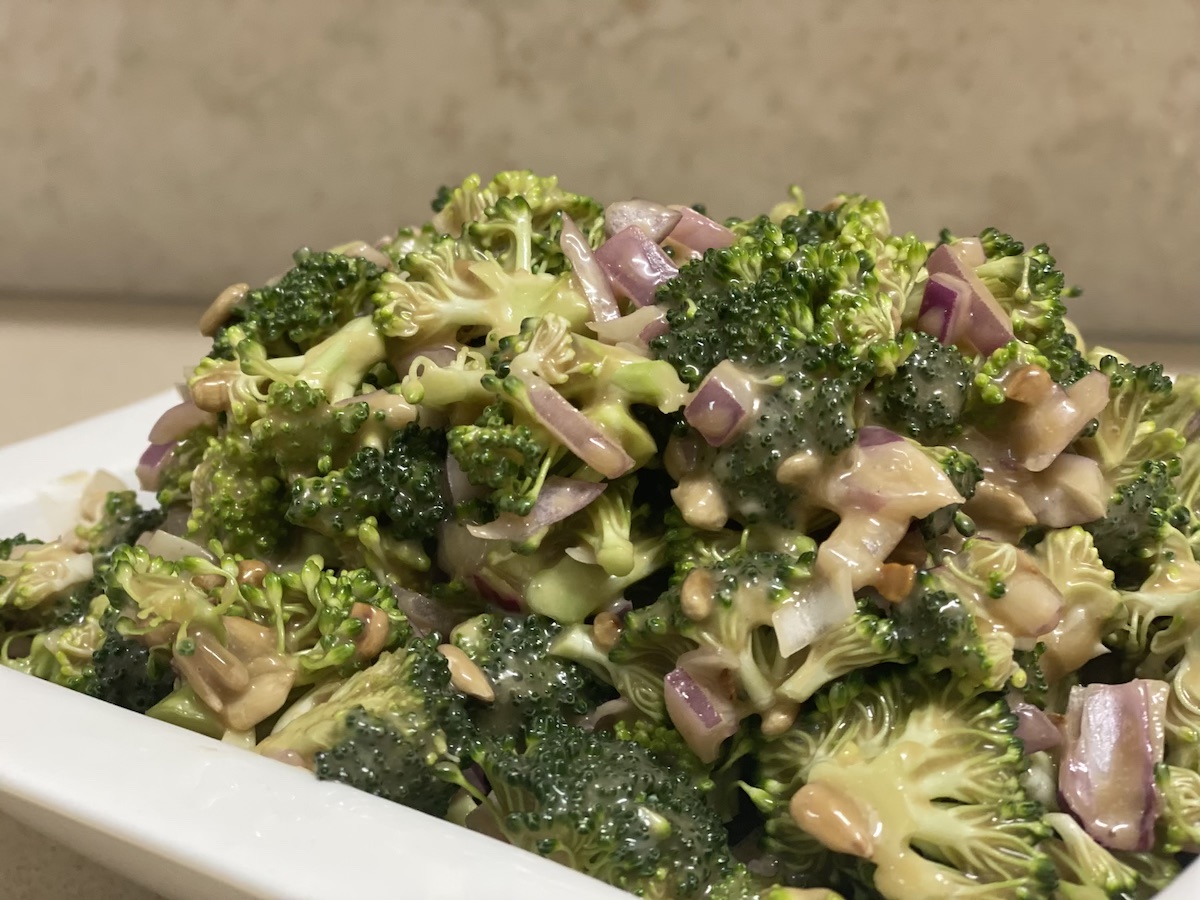
Finally, at last the famous broccoli salad. This salad is a great addition to either a Shabbat meal or a “braai”.  It’s just a few simple ingredients and is so basic and easy to make but it’s always a huge hit.

What you need 

  • 1 or 2 heads of Broccoli
  • Sunflower seeds
  • Red or white onion

What you need for the dressing 

  • Mayonnaise
  • Brown sugar
  • Balsamic vinegar

Cut the broccoli down into bite sized pieces.  Dice your onion into small pieces.  We prefer red onions.  It adds a bit of colour and tastes a bit sweeter.

Mix the broccoli and onions together.

Mix the ingredients for the dressing together to taste.  Allow the sugar to dissolve into the mayonnaise and vinegar before dressing the salad.

We normally taste the dressing as we go along to make sure that it is sweet and acidic enough and of course that there is enough to cover all of the broccoli.

In a frying pan toast your sunflower seeds.  Make sure that you keep a close eye on the sunflower seeds as not to burn them.  They are very sneaky, one moment they are still happily toasting away and the next moment they are burned.  Please note that sometimes they continue to roast even after you have taken it off the heat.  So then it is best to immediately transfer them into a bowl to cool down instead of keeping them in the pan where they might burn.  You can skip this step but when you toast the seeds it enhances the flavour.

Once the sugar in the dressing has dissolved you can mix it together with the broccoli and onions.

The sunflower seeds we add to the salad just before we want to serve it, this way they still have their crunchy texture.

We have also added cranberries to this salad on occasion to mix things up a bit.

Quinoa Salad

01Jan

One of our dear friends introduced Jacques to quinoa salad while she and her daughters were visiting Israel even before we got married.  A quinoa salad is a great addition to any meal.  We especially like to serve it when we are making a roast in the oven as it’s fresh acidic taste brings a nice balance to a rich meaty taste.

I have a hard time making the quinoa itself as it has a tendency to overcook which leaves the texture mushy, so I have now opted to leave the preparation of the quinoa in Jacques’s capable hands. There are many helpful websites with instructions on how to prepare quinoa but this is a method that works for us.

What you need for the salad

  • Dried quinoa
  • Cranberries or dates
  • Fresh mint leaves
  • Shavings of almonds

What you need for the dressing

  • Olive oil
  • Apple cider vinegar
  • Dijon Mustard we like to use the one with the mustard seeds in.
  • Maple syrup or honey
  • Salt and ground pepper
  • Lemon juice

A very important step is to first wash the quinoa before you boil it as it can have a bitter taste to it if you don’t.

We use a ratio of 1 cup of quinoa with 1 and 1/2 cups of water with a bit of salt.  With the lid off bring the quinoa to a boil. Reduce the heat, cover the pot and allow to simmer for 10min (please set a timer as it is so easy to forget about your quinoa on the heat).  Remove the pot from the heat and leave it covered to steam for another 10 minutes.  Remove the lid fluff the quinoa using a fork.

Allow the quinoa to completely cool. We normally cook it the day before and combine the rest just before serving to keep everything nice and fresh. You can also make the dressing the day before.

When making the dressing make sure that you do not make too much, you basically just want to wet the salad and not drench it with dressing. We use about the same amount of olive oil, apple cider vinegar and lemon juice and then add the mustard and maple syrup, salt and pepper. Taste the dressing to make sure it has enough of everything. You might want it a bit more sweet or acidic, it is easier to adjust the flavour of the dressing before adding it to the salad.

Add your sliced almond or nut of your choice. It is just to add a crunchy texture to the salad, so you don’t need too much.

Add the cranberries or dates. Cranberries are easy while dates are a bit more work. Both options are great, this depends on your personal preference. For the dates you need cut it open and remove the pip, cut it into 1/2cm slices lengthwise and then cut these strips into squares. Dates get sticky when cutting to avoid it sticking to the knife you can oil your knife or keep a container of hot water nearby to melt the sugars off the knife.

The mint leaves are a bit of a hassle to prepare but the taste is worth the while.  We normally purchase a nice bunch of fresh mint.  Remove the leaves and stack them on top of each other and roll them up like a little cigar. Then we cut it into thin strips.  The more mint you add to your salad the more flavour and colour you will have.

Just before serving, add the dressing and make sure everything is well combined. If you have some extra dressing you can save it for later. You can add some mayonnaise to it this goes very well on a leafy salad.

This is a very nice way to serve the quinoa salad and we prefer to keep it simple. 

If however you want to increase the volume of your salad you can consider to add chopped cucumber pieces, cherry tomatoes cut in half, diced red onions or even diced of bell peppers.

Roasted Butternut and Glazed Nuts Salad

01Jan

One of our favourite salads to make is a large leafy salad.  We purchase different types and colour salad leaves and then you can basically do anything on top of it.

Of course one of our main goals when preparing a salad is to make it as beautiful as possible.  We normally use a flat serving plate so that all the elements of the salad can be appreciated and all the guests can help themselves to all the different ingredients.

What you need for the salad

  • Different kinds and colour salad leaves 
  • Butternut
  • Olive oil and spices for the roasting of the butternut
  • Walnuts or any nut of your choice 
  • Butter and honey or syrup to glaze the nuts
  • Red onion
  • Feta cheese 
  • Roasted sunflower and pumpkin seeds

What you need for the dressing

  • Honey
  • Mustard 
  • Vinegar 
  • Mayonnaise 
  • Salt mixture of your choice 

Peel and cut the butternut into pieces.  Not too small as they do tend to reduce in size while roasting.  This of course is Jacques’s job as I do not have enough strength in my arms to cut through the larger pieces of butternut

Coat the butternut with olive oil and any spices that you prefer. More oil is better, we aren’t deep frying it but we are also not shy with the oil.  Salt is also important, you might get a nice color by adding paprika or cinnamon but if there is no or little salt the taste would be less pleasant that having just enough salt.

Spread them out in a single layer onto a baking dish and place them in the oven.  Make sure to stir them around on the dish every now and again to allow an even roast.  When they are soft but not mushy and have a nice brown colour remove them and allow to cool down.

In a pan melt butter and either honey or syrup.  Add the nuts and stir until all the nuts are covered in the butter.  Continue to stir around until the butter and syrup form a nice sticky coat over the nuts.  It is better to work on a lower flame so that you do not burn the nuts.  Once they are nice and sticky put them on a baking sheet and separate them as much as possible and allow to cool down.

Cut your red onions in nice thin slices.

Put the sunflower and pumpkin seeds into a pan over a low heat.  Stir or even better if you can toss them around in the pan until you can smell them roasting – remove from the heat and allow to cool.

Now to pack the salad.

Here you can either do a single layer or a double layer of all the ingredients.

Take your serving dish and cover the base of the dish with your assortment of salad leaves.  

Here you can be creative and pack the rest of the ingredients onto the salad leaves.  

Normally we leave the feta and seeds for last.

Mix all the ingredients for the dressing together.  Do not use too much vinegar, it is actually just there to allow your dressing to be a bit runny but not too runny for easier application.

Make sure that you taste your dressing before adding it to your salad.

We normally add the dressing just before serving it so that it doesn’t just run down the plate.

When adding the dressing it is important not to drown your salad.

With a salad the sky is the limit.   You can add and take away according to your taste. The trick is in the presentation and making sure that all your ingredients are nice and fresh.

Carrot with Sweet Chilli Sauce

01Jan

This is an accidental salad. We were planning on making carrots in the oven to serve as a hot side with our main course but we had a few last minute surprise guests and then we realized that we had too little carrots to serve as a side dish so we decided to make it as a salad together with our Challah and other salads. 

What you need

  • Carrots 
  • Olive oil
  • Sweet paprika spice 
  • Sweet chilli sauce
  • Ground salt

Peel and cut your carrots 

We like to play around with different shapes when it comes to cutting carrots. We cut these diagonally but your carrots can be any shape.

Place the carrots in a baking dish and cover them with olive oil, sweet chilli sauce, salt and paprika. 

Stir it through making sure that all the carrots are covered and roast it in the oven uncovered  until they are soft and the sweet chill has formed a nice sticky glaze on the carrots.

Remember to stir the carrots a few times through the roasting process a few times to avoid them from burning and to make sure that they all cook evenly and stay covered in the sauce.  

When roasting carrots it is also best to rather have a single layer of carrots than too many on top of each other so that they roast evenly instead of steaming.

When the carrots are done allow them to cool down, serve them in a nice glass bowl and dress it with a nice piece of fresh coriander.

Although it was an accidental salad, I think it will definitely be a repeat dish.

Grilled Eggplant

01Jan

I have heard so many times that people say, “I do not like eggplant”.

So I love to prepare for them one of our many good eggplant dishes to try and win them over – I am not even sure why because I also do not like eggplant.  Most of the time the dish wins and eggplant gains another fan.

What you need 

  • Eggplant (obviously)
  • Tahina (I am not sure if you even get it in other countries – but if you come to visit us you can buy yourself a bottle of it and make the dish when you return home.)
  • Date syrup (again not sure if you get this outside of Israel but you could probably replace this with golden syrup or honey) let me know if you find it so that I can update this comment

For the toppings on top of the eggplant after you apply the tahina and date syrup

  • Pomegranates, dried cranberries or even fresh tomato cut into small cubes (I don’t use the tomato because then Jacques doesn’t enjoy the dish)
  • Optional some chopped chives for garnish.  We fully believe that you eat with your eyes so we are always trying to present our dishes in the most attractive ways as possible.

First we cut the eggplant in half – wait wait wait before you cut – it has to be length wise from top to bottom

Then you make cuts into the eggplant – wow how will I explain this to you now.

Wait a bit I will ask Jacques to write the next line.

Without slicing through the skin make diagonal cuts about 1-1,5cm apart in one direction rotate the eggplant 180 degrees and make more diagonal cuts in the other direction. This will form small squares on the eggplant. I like to use a knife with a rounded end that I don’t accidentally cut through the skin.

Then we brush the eggplant with olive oil and season it with whatever spice I feel like putting on – so use your imagination.

Then we place them skin side down into the oven uncovered and let them roast. When the eggplant has lost its sponge like texture and the little squares starts to crisp up then you know it is done.

Normally we serve this one cold so it is ok to do it a few hours before the meal starts.

Then just before we serve it (and by this I mean really just before otherwise the Tahina and date syrup runs down) we take the Tahina in a squeeze bottle and squeeze a few random lines all over the eggplant and also over the plate to make it pretty. Next do the same with the date syrup and add the topping of your choice.

By the way if you use fresh tomatoes maybe salt it a bit before you add it as a topping.

Grilled Potatoes

01Jan

This is such a simple side dish but it is our son Caleb’s favourite dish. He thinks it is the main dish and helps himself to half a tray and only dishes up a side of the main. Unless it’s steak he loves his steak even more.

What you need

  • Potatoes
  • Olive Oil
  • Spices of your choice
  • Salt

Taking whole potatoes and of course washing it off first before we cut it into half.

Before packing it into the foil pans/baking dish, we first coat the pan with a layer of olive oil and spice (depending on the mood – we have used almost everything under the sun).

Then Jacques very skillfully plays Tetris with the potatoes as to fit the most into one pan, cut side facing downward.

Then we brush the potatoes with more olive oil and spice it again.

How simple is that?

Put it uncovered into the oven for about an hour until it becomes nice and crisp on the bottom and top and then serve for the delight of everyone.

It is even nice when served cold the next day.

We have made this dish to accompany a braai, meat or fish grilled in the oven or even just as an easy lunch on its own for our kids.

Always a winner!

Potato Gratin

01Jan

This is also one of the recipes that I took from my mother’s house.  She makes it a bit different to us as we have made some adjustments to suit our own tastes.

In South Africa you can buy a “Potato Bake” mix which adds flavour to the potatoes.  Many times we are able to receive this from friends that visit us but when we run out we have to make a different plan.

This potato dish is one of Abigail’s favourite dishes and she is always so excited when we prepare it for shabbat.

What you need

  • Potatoes
  • Onions
  • Mushrooms (optional), we very rarely use mushrooms as Abigail prefers it without mushrooms
  • Salt or spice of your choice
  • Cream
  • Potato Bake or Creamy Mushroom Soup Powder
  • Shredded cheese for the top layer

What works best for us is if Jacques cuts the potatoes and onions and I pack the baking dishes.  He cuts the potatoes and onions in thin slices.  Jacques has such wonderful knife skills and has the ability to cut anything that it still looks good.

Pack a layer of potatoes at the bottom of your baking dish.  Sprinkle the spice of your choice on the potatoes, be careful not to use too much, just enough to make sure that your potatoes do not taste bland.

Next pack a layer of onions, it does not need to be a perfect layer, I just make sure that most of the potatoes are covered with a thin layer of the onions.  

If you are using mushrooms then this would be the time to make a thin layer of mushrooms.

After the first layers are packed, repeat the whole process again until you have reached the top of your baking dish.

I recommend that you stop about 1-2 cm before reaching the top of your baking dish otherwise you might find that you do not have enough space to pour over your cream and your shredded cheese

Mix your Potato Bake or Mushroom Soup powder with cream, making sure that the powder is mixed well with the cream.  Unfortunately like so many other occasions I cannot tell you exactly how much of what as I always guess, but for those of you who wish to mix it more accurately you can safely follow the instructions on the Potato Bake packaging or at least double the amount of soup powder that is suggested to making soup in ratio to the fluid.  

Once it is mixed pour it over all the potatoes making sure that you cover them well with the cream mixture.  Cover your baking dish with foil and then place it into a hot oven, 150-180°C, for about an hour to 90 minutes.  The time in the oven also depends on the thickness of your potatoes slices.  This is also why we recommend cutting them into thinner slices, this allows them to need less cooking time.

Once the potatoes are soft, stick a sharp knife into the middle of the dish to test, you can remove the foil.  At this point cover it with a nice amount of shredded cheese and then place it back into the oven.  If you are in a rush you can put your oven on grill which will allow your cheese to brown faster.  Most if the time we have something else in the oven as well and I prefer to give it a slower browning time. I keep the oven on its baking setting and with time the cheese browns.

When serving it is nice to add some green colour on top of the cheese.  We basically use any greens that we have in the fridge, from fresh parsley to spring onion, they all get the job done.

What is great about this recipe is, you bake a few dishes easily put one or two in the freezer and reheat it for another occasion.

Sweet Potatoes in the Oven

01Jan

This recipe is something I learned from my mother.  She used to make it often when we were growing up especially with a roast.  Today it has also become one of Miriam’s favourite dishes.  So I think it will continue for another generation.  The only difference is our sweet potatoes here in Israel are orange instead of a more yellow coloured one as in South Africa.

My mother used to make it in a pot on the stove and we started out doing it like this but due to the fact that we have to serve it on a large scale we started preparing it in the oven.

What you need

  • Sweet potatoes
  • Butter
  • Golden syrup (a healthier version would be honey or even date honey)
  • Ground Salt

Peel the sweet potatoes and cut them into rings.  Make sure that the rings are not too thick but also not too thin, maybe 1.5-2 cm thick.  The idea is that they would be more or less the same size to help with an even cooking time.

In a pot

Place the raw sweet potatoes in a pot on a medium to high heat. Be careful not to over crowd the pot.  Cut your butter into smaller pieces and distribute it amongst the sweet potato pieces.  Grind enough salt over the sweet potatoes.  Pour your syrup or honey over all the pieces.  

Stir through and cover the pot with a lid.  

While the sweet potatoes are still hard you can stir it frequently to make sure all the pieces are covered with butter and syrup.  

Once they soften you have to be careful not to stir them too much to prevent it from becoming mash.  At this point we remove the lid of the pot to allow the syrup to caramelise.

In the oven

Heat your oven to 150 degrees Celsius.  Place the raw sweet potatoes in a baking dish, be careful not to over crowd the baking dish.  Cut your butter into smaller pieces and distribute it amongst the sweet potato pieces.  Grind enough salt over the sweet potatoes.  Pour your syrup or honey over all the pieces.

Once the butter and syrup starts to melt remove it from the oven and stir it to ensure that all of the sweet potatoes are coved with the butter and syrup and place it back into the oven.

You can repeat this a few times during the cooking process to make sure that the sweet potatoes remain covered with the butter and sugar.  Once they are soft and the syrup should have caramelised and it is ready to serve.

If you see that the syrup is runny, you can pour the syrup into a pot and reduce it on the stove and then pour it over the sweet potatoes again. This usually happens if they were overcrowded and the steam created couldn’t escape.

Sweet Potato or Butternut Pie

01Jan

We found this recipe online a few years ago, unfortunately the link isn’t available anymore but this is more or less the recipe.

It is a Beit Chai favourite.  Although this is a side dish people often tell us that it could be a dessert.  We have yet to have a guest that did not fall in love with this dish.  

As per the name we have used both sweet potato or butternut to make this dish.  Unlike the South African sweet potato in Israel our sweet potatoes are orange.  We have never tried it with South African sweet potatoes. 

What you need for the Pie

  • 100g Butter
  • 170g Sugar
  • 3 Eggs
  • 120g Self raising flour
  • Salt
  • 5ml Vanilla essence
  • More or less 3 cups of butternut or sweet potato 

What you need for the sauce

  • 150g Butter
  • 100ml cream
  • 100g sugar

When preparing the butternut we find that it is better to wrap them in foil and roast it in the oven rather than to boil it in water. If you follow our foil method you need to allow at least an hour maybe more depending on the size for the butternut to become soft enough.  Once they are soft allow them to cool.  Remove the foil and then as easy as one, two, three you can remove the skin and seeds from the flesh of the butternut.  If you boil or steam it, you have to make sure that you drain all the water from the butternut before adding it to you batter.  

If you choose to use sweet potato, then boil or steam it. We cut it into pieces and put it in a strainer over a pot of boiling water.  This way we eliminate the danger of the sweet potato absorbing a whole lot of water.

Pre heat your oven to 180 degrees Celsius.

Cream the sugar and butter together until it is are nice and fluffy.

Add the eggs and continue to beat together. 

At this point I exchange my whipping head to a batter head.

Add the sifted flour and salt to the mixture and mix it together making sure the flour doesn’t cause any lumps to form in your batter.

Add the vanilla essence and pumpkin to the mixture and mix it one last time.

Oil your baking dish and pour your batter into the baking dish.

Bake in the oven for at least 45 minutes.

Due to the fact that we very seldom only make the batter once we find that we have to keep it in the over for a bit longer than 45 minutes, so my advice is that you will test your pie before removing it from the oven to make sure it is fully cooked. Once the pie has finished baking you will be adding a sauce over the pie, so over baking it doesn’t cause too much of a problem. The sauce is poured over while the pie is still hot, making sure that every part of the pie absorbs the sauce.

While the pies are in the oven we melt all the ingredients for the sauce in a pot on the stove and allow it to simmer and reduce a bit.  It is almost the same method as what you would follow when making a Malva Pudding (we will add a recipe soon).  The only difference is that we do not reduce the sauce as much as when we make a Malva pudding.  The reason for this is because the dough is a much denser dough and we find that if the sauce is too thick the pie doesn’t absorb the sauce enough.  

Here we have discovered some tricks to help with the process.

We make sure that the pie is loosened from the edges of your backing dish before the sauce is poured over.

Jacques invented a nice tool for us to poke some holes into the pie.  He took a wine cork and inserted 4 toothpicks into the side of it.  Holding onto the cork, he pokes the toothpicks into the pie until there are enough holes to allow for maximum absorption.  A fork can also be used but we found the it sometimes makes ugly holes.

This pie is better served with a spoon to dish up with than trying to cut it into pieces.

This pie also does well in the freezer if you have left overs or extra pies that you want to use at a later date.

Meatballs

01Jan

Meatballs are one of our go to dishes when we know that we will receive guests in a time that we might not have enough time to create a full meal.

It is so easy to prepare beforehand and then store in the freezer for when we need it.

We used to be able to buy nice quality mincemeat in Israel at a reasonable price but those days have long since passed so we had to come up with an alternative.

When we shop we always look for cuts of meat that are good quality but at a reasonable price.  When we find those we purchase it and keep it in the freezer to use when we need it.

When we want to make meatballs we normally use these cuts of meat and grind them up ourselves.

What you need

  • Ground beef
  • Onion
  • Eggs
  • Quick fine Oats

Some spices that we like to mix with the meat

  • Cinnamon
  • Salt
  • Flippen lekker spice, Worcester sauce flavour (from South Africa)
  • Origanum
  • Sugar
  • Ina Parman’s meat spice (from South Africa)

What you need for the glaze

I will not give any exact amounts because I cannot – I never use any measuring system when making a dressing.

We like to make our own combination of glaze and it can include any or all of the following.  It depends on the flavour that you wish to have.

  • BBQ sauce
  • Chutney
  • Sweet Chilli
  • Tomato Sauce
  • Mustard

When we grind our meat we usually grind up the onion together with the meat to make sure that it is nicely combined. If you are using ground beef, you can add chopped onions to it.

With our meat ground we add our spices – now here is where it gets exciting – adding the spices

We find meatballs to be very forgiving when it comes to flavouring. We have literally tried almost any spice when making meatballs at is has never come short in taste

The important thing of course is to make sure that you have enough salt in the mixture.

Like I said basically anything works – it depends on the flavour that you are looking for.

Then we add some eggs and also oats to make sure the meat binds together when we make the balls – the oats also helps to absorb some of the moisture that cooks out of the meat.

Now all that is left is rolling the balls and packing them in the baking dish.

We like to weigh our balls on the scale to make sure each one is the same size.  We have found that 50 grams is a good size for us to fill up a foil pan nice and snugly. We put 24 meatballs neatly line up in 6 rows which is also a great size for our tables. Each person can then get at least 3 to 4 meatballs.

We normally bake the meatballs covered with foil in the oven for at least 30 minutes.  After 30 minutes we take them out and remove any extra meat protein and drain the extra meat juices from the baking dish.

We often take the meat juices from the meatballs and add it to our glaze to make it a bit easier to apply.

Then we coat the meatballs using a food brush – again so many different things work.

Once the meatballs are coated we put them back into the oven (uncovered) for a while so that the sauce can brown the meatballs.  

Now is when you want to make sure that you do not have them in the oven for two longs to prevent them from becoming dry.